Introduction to Compound Microscopes
The compound microscope has become a staple in scientific research and education. A major step up from simple microscopes, it allows users to see the minute details of the microscopic world. In essence, a compound microscope is a high-power, precision instrument. It magnifies objects using a series of lenses.
Understanding the compound microscope labeled parts is critical for effective usage. The main components include the eyepiece or ocular lens, objective lenses, stage, and illuminator. Each part plays a pivotal role in the functioning of the microscope. As students and scientists peer through the eyepiece, they enter a world previously hidden to the naked eye.
The body of a compound microscope is designed to accommodate interchangeable lenses. This adaptability enables various levels of magnification. The labeled parts ensure that users can quickly identify adjustments needed for optimal viewing. By mastering what each labeled part does, one can use the microscope to its full potential.
When discussing the compound microscope labeled features, it’s important to remember that the device requires careful handling. A user must know where to hold the microscope and how to adjust the lenses without causing damage. A well-labeled diagram can guide beginners and seasoned professionals alike.
As we dive deeper into the components and their functions, you will learn how to operate and maintain a compound microscope. This knowledge is invaluable, whether in a classroom setting, research lab, or hobbyist’s workspace. The subsequent sections will elaborate on these key elements, empowering you to utilize the compound microscope labeled components with confidence.
Key Components of a Compound Microscope
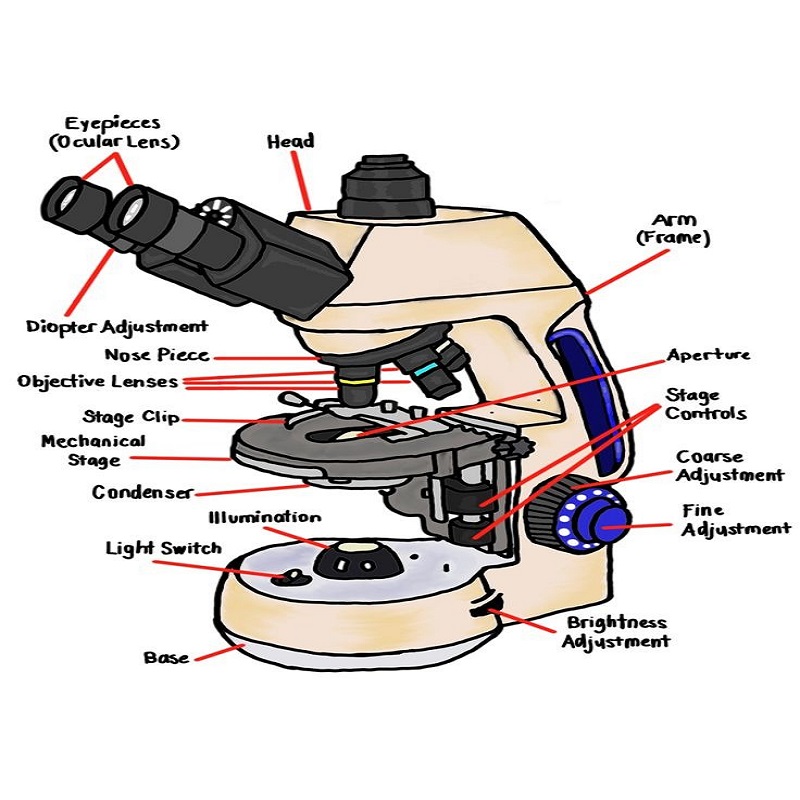
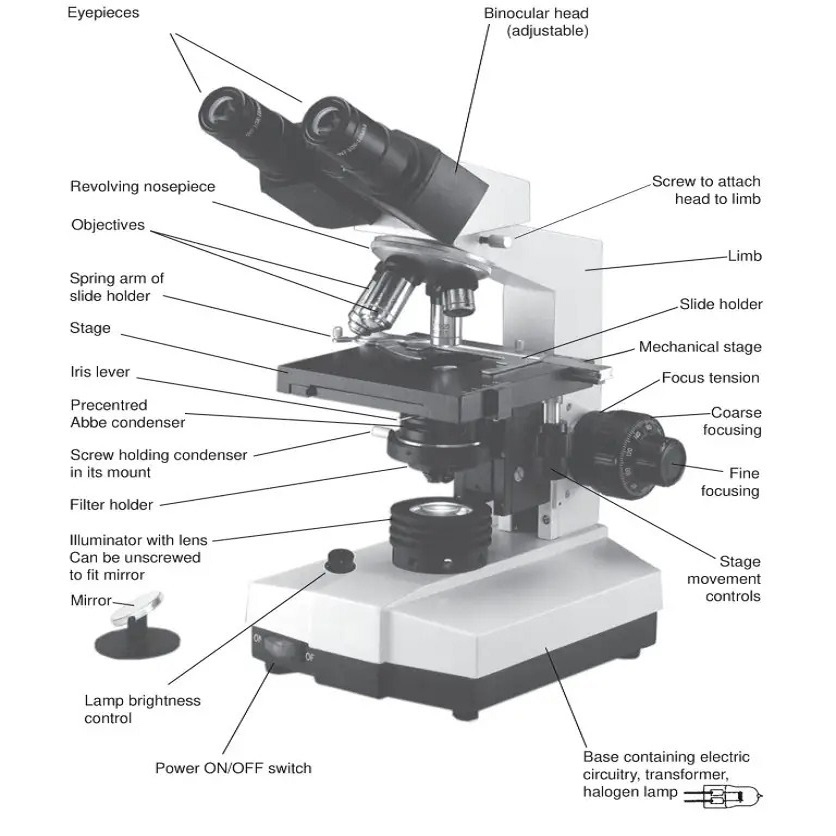
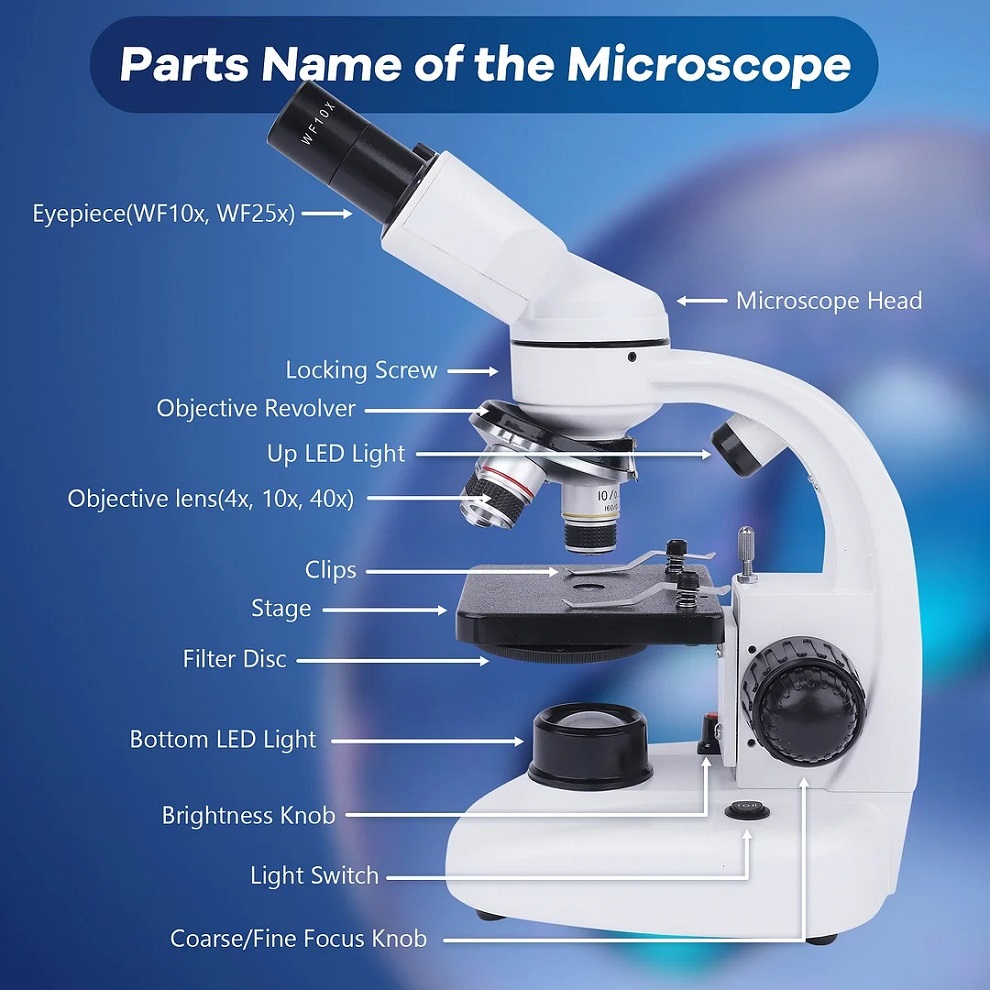
A compound microscope boasts several key parts, each with its specific role in magnification. Recognizing these components is essential for any user. Here are the main parts of a compound microscope labeled for your understanding:
- Eyepiece or Ocular Lens: This is where you look through to see the magnified image. It usually contains a 10x magnification lens.
- Objective Lenses: These are found on a rotating nosepiece and range in power. They magnify the specimen and work with the eyepiece lens for higher magnification.
- Stage: The flat platform where the slide holding the specimen is placed. It often includes clips to secure the slide.
- Illuminator: A light source beneath the stage that shines light through the slide for clear viewing of the specimen.
- Focus Knobs: These consist of coarse and fine adjustment knobs. They help to sharpen the focus on the specimen.
- Condenser: A lens system below the stage which focuses light onto the specimen.
- Diaphragm: Located under the stage, it controls the amount of light reaching the slide.
Each part of the compound microscope labeled above works together to provide a detailed view of microscopic subjects. Familiarity with these components leads to better handling and more effective microscopy.
Functions of Labeled Parts
Understanding the functions of the compound microscope labeled parts is key to mastering its use. Let’s break down the purpose of each component.
- Eyepiece or Ocular Lens: This main interface between the user and the microscopic world amplifies the image created by the objective lenses. Its typical 10x power is integral to reaching the desired magnification.
- Objective Lenses: Mounted on a rotating turret, these lenses have varying magnifications, usually from 4x to 100x. Their job is to magnify the specimen and project the image to the eyepiece.
- Stage: The platform that holds the slide in place. It’s critical for stabilizing the specimen for observation.
- Illuminator: This light source ensures that the specimen is well-lit, enhancing clarity and contrast for better viewing.
- Focus Knobs: These knobs are crucial for clarity. The coarse knob brings the specimen into general focus while the fine knob sharpens the image.
- Condenser: Situated below the stage, this lens narrows the beam of light focused on the specimen, improving the image details.
- Diaphragm: It adjusts light intensity. Proper use of the diaphragm can greatly improve image contrast.
Each labeled part of the compound microscope plays a vital role. Mastering their functions facilitates a greater understanding of microscopic analysis.
How to Properly Use a Compound Microscope
Proper use of a compound microscope is essential for precise observations. Here’s a step-by-step guide:
- Place the Microscope on a Stable Surface: Ensure the microscope sits flat on a sturdy table or bench.
- Prepare Your Specimen: Mount the specimen on a slide if it’s not already prepared.
- Secure the Slide: Position the slide on the stage and use the clips to hold it in place.
- Select the Starting Objective Lens: Rotate the nosepiece to use the lowest power objective lens first.
- Adjust the Illuminator: Switch on the light source and use the diaphragm to regulate the light intensity.
- Look Through the Eyepiece: Lean in and peer through the eyepiece or ocular lens with your eye.
- Focus Your Specimen: Turn the coarse focus knob to raise or lower the stage until you see the image; then use the fine focus for clarity.
- Increase Magnification: Once focused, you may rotate to a higher power objective lens for greater detail.
- Adjust Lighting and Focus as Needed: Modify the diaphragm and refocus using the fine adjustment if you switch lenses.
- Observe and Take Notes: Carefully inspect the magnified specimen and record your observations.
Remember to handle the microscope gently. Delicate focusing and cautious adjustments will lead to clear and valuable microscopic images. For optimal use, incorporate the compound microscope labeled parts efficiently and always take time to properly adjust each component for advanced viewing.
Care and Maintenance of Compound Microscopes
Taking proper care of a compound microscope ensures its longevity and accuracy. Maintenance involves a few essential practices that are easy to follow. Here are some tips to take care of your compound microscope:
- Handle with Care: Always use both hands when moving the microscope. Never grab it by the eyepiece or objective lenses.
- Clean Regularly: Wipe the exterior with a soft, lint-free cloth. Use special lens paper for cleaning the ocular and objective lenses.
- Avoid Contact with Chemicals: Keep chemicals away from your microscope to prevent corrosion or damage to the lenses.
- Cover When Not in Use: Protect the microscope from dust by covering it with a protective case or cloth.
- Check for Loose Parts: Regularly inspect your microscope for any loose components and tighten them if necessary.
- Store Properly: Keep the microscope in a dry, cool place, away from direct sunlight to prevent damage from heat and humidity.
- Regular Professional Servicing: Have your microscope serviced by a professional periodically to ensure all parts are in good working condition.
By following these simple care and maintenance steps for your compound microscope, you’ll extend its operational life and preserve its precision for future observations.
Common Misconceptions about Compound Microscopes
As with any complex tool, a number of myths surround compound microscopes. It’s important to correct these misconceptions for users to value and utilize these devices properly.
- More Magnification Equals Better Clarity: People often think that the higher the magnification, the clearer the image. However, excessive magnification can blur details. The key is to use appropriate magnification for the specimen.
- Microscopes Are Only for Scientists: While widely used in science, compound microscopes serve many functions. Hobbyists and students benefit from them, too.
- Complex Operation: Some believe that using a compound microscope is always complicated. With training and practice, operating a microscope can become second nature.
- The Bigger, The Better: The size of the microscope does not necessarily correlate with its quality. Compact microscopes can be just as effective as larger ones.
- Digital Microscopes Have Replaced Compound Microscopes: Despite the rise of digital microscopy, traditional compound microscopes are still essential for hands-on learning and certain research tasks.
Understanding the reality about compound microscopes clears up confusion and enhances the user experience. Dispelling myths leads to better usage, maintenance, and appreciation of these intricate instruments.
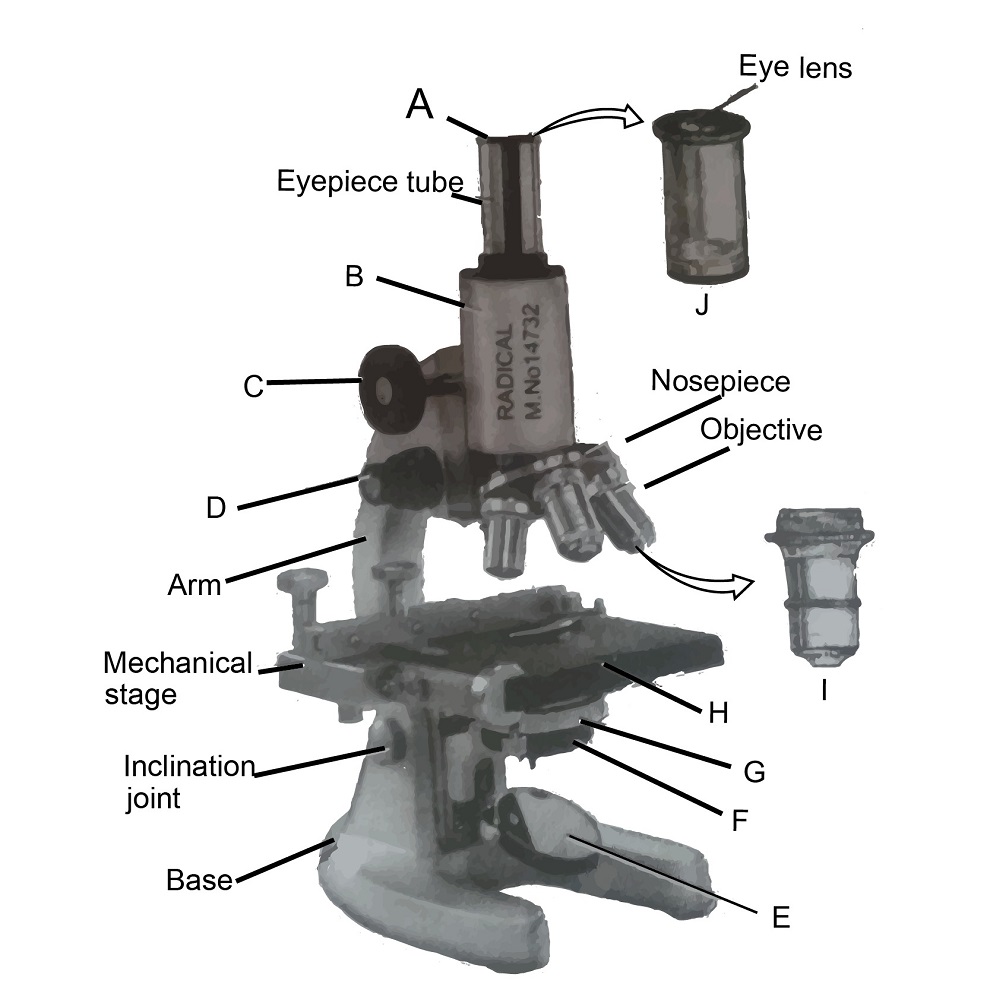
Advances in Microscopy: From Simple to Compound
The evolution of microscopy has been remarkable, moving from simple magnifying lenses to sophisticated compound microscopes. This advancement has revolutionized our ability to investigate the microscopic world. Simple microscopes, equipped with a single lens, could only provide a limited enlargement of objects. However, the invention of the compound microscope, with its multiple lenses, has vastly increased magnification and resolution, allowing for intricate details to be observed.
The transition from simple to compound microscopes wasn’t abrupt. It involved gradual improvements in lens quality and light control. In the past, simple microscopes were restricted to low magnification because a single lens could only magnify so much before the image became too distorted to be useful. These constraints led to the development of the compound microscope, labeled with a series of lenses that work together.
With the compound microscope, labeled parts such as the objective lenses and ocular lens combine to magnify a specimen several hundred times its original size. Technological innovation has also improved illumination techniques, incorporating mirrors and electric lights to enhance the visibility of samples.
Evolution in microscopy also includes advancements in focusing mechanisms. Finer controls have been integrated, enabling precise adjustments in focus that simple microscopes lacked. This progress ensures that users of compound microscopes labeled with these features can achieve the utmost clarity when examining slides.
In summary, the development from simple to compound microscopes has empowered scientists, students, and hobbyists to delve deeper into the microcosm. Understanding the parts of a compound microscope labeled for different functions is now more crucial than ever in driving further scientific discoveries and fostering education.
Choosing the Right Compound Microscope
Selecting the right compound microscope involves more than just picking one at random. To get the best results, it’s essential to consider certain factors:
- Intended Use: Different fields require different magnification levels. Think about your specific needs.
- Quality of Lenses: High-quality lenses provide clearer images. Look for microscopes with superior lens craftsmanship.
- Magnification Range: Ensure the microscope offers a range suitable for your observations.
- Ease of Use: A user-friendly microscope with intuitive controls is preferable for frequent use.
- Durability: Choose a well-built microscope to withstand regular use over time.
- Lighting Options: Good illumination is crucial. Options like LED lights can provide consistent brightness.
- Budget: Microscopes come with varying price tags. Balance your requirements with how much you can spend.
To sum up, think about your needs, check lens quality, confirm magnification, look for user-friendliness, ensure durability, consider lighting, and stick to your budget when choosing a compound microscope. The right choice will enhance your viewing experience and provide reliable performance for years to come.