Introduction to Microscope Components
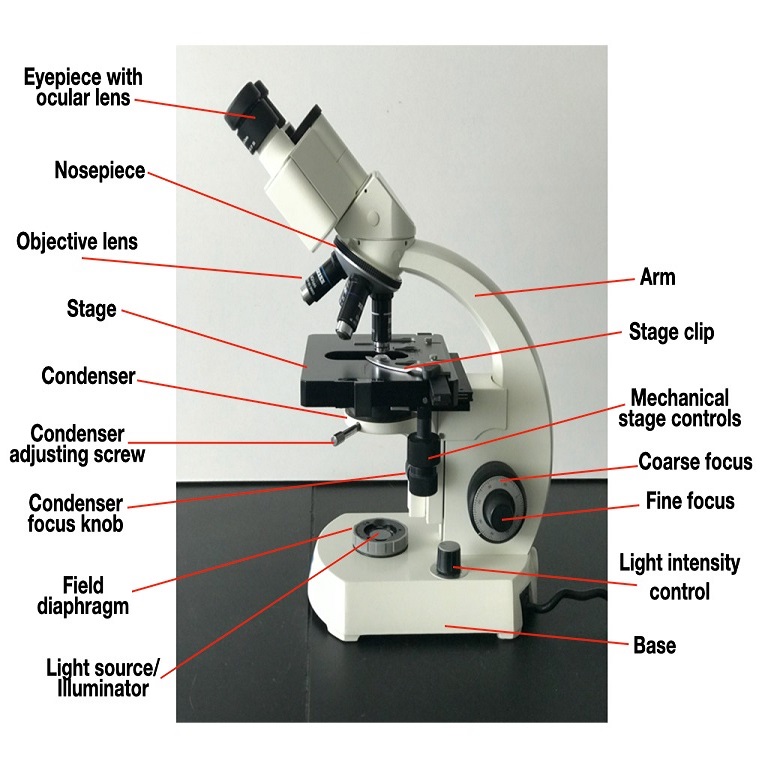
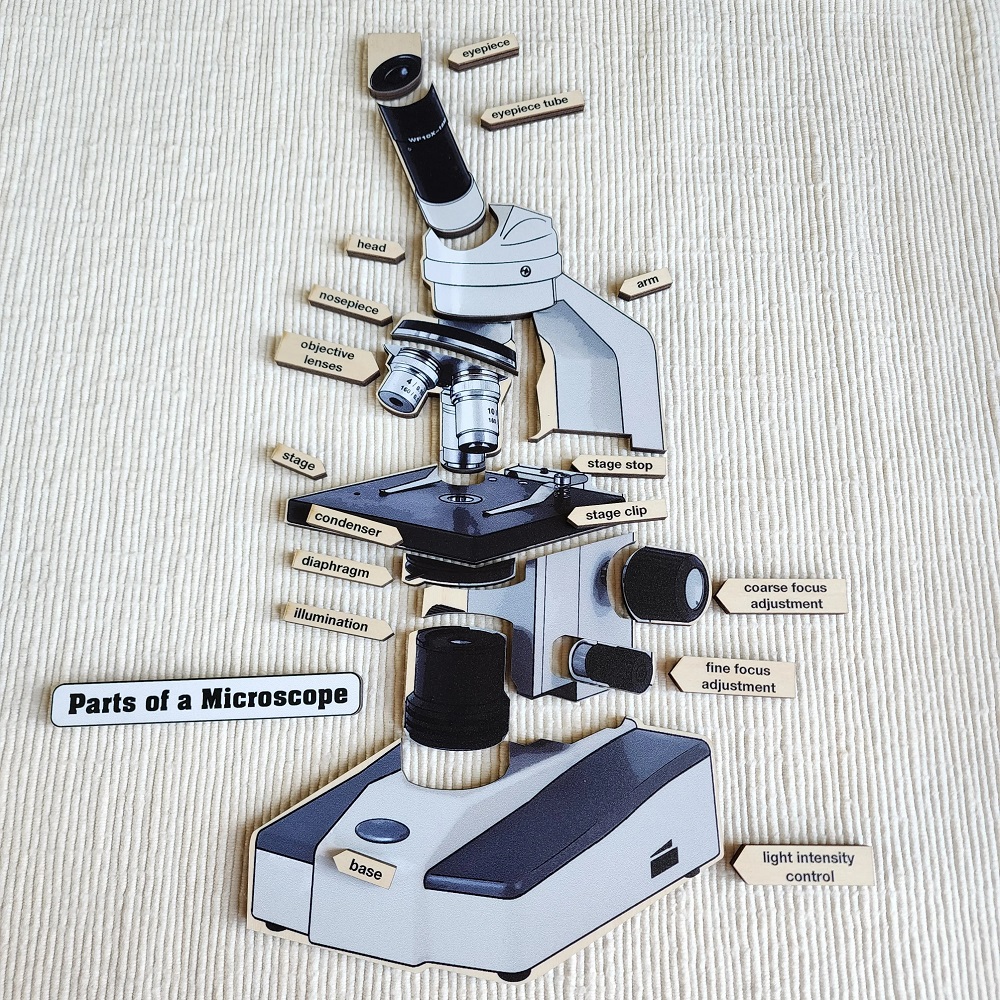
Understanding each part of a microscope helps us use it effectively. A microscope consists of many different components, each serving a distinct function. Let’s start at the very beginning and introduce the various microscope parts and functions. The base and arm act as the framework, providing stability. The stage holds and secures the specimen. The illumination system lights up the specimen for better visibility. Lenses, including objectives and the eyepiece, magnify the item under observation. Focus controls, such as fine and coarse adjustment knobs, sharpen the image. The condenser and diaphragm manage light quality and focus. Aside from these fundamental parts, microscopes often have extra features like camera ports and filters. For longevity and optimal performance, proper maintenance and care of microscope parts are crucial. Each piece works in harmony to unlock a microscopic world that is invisible to the naked eye.
The Base and Arm: Structural Foundation
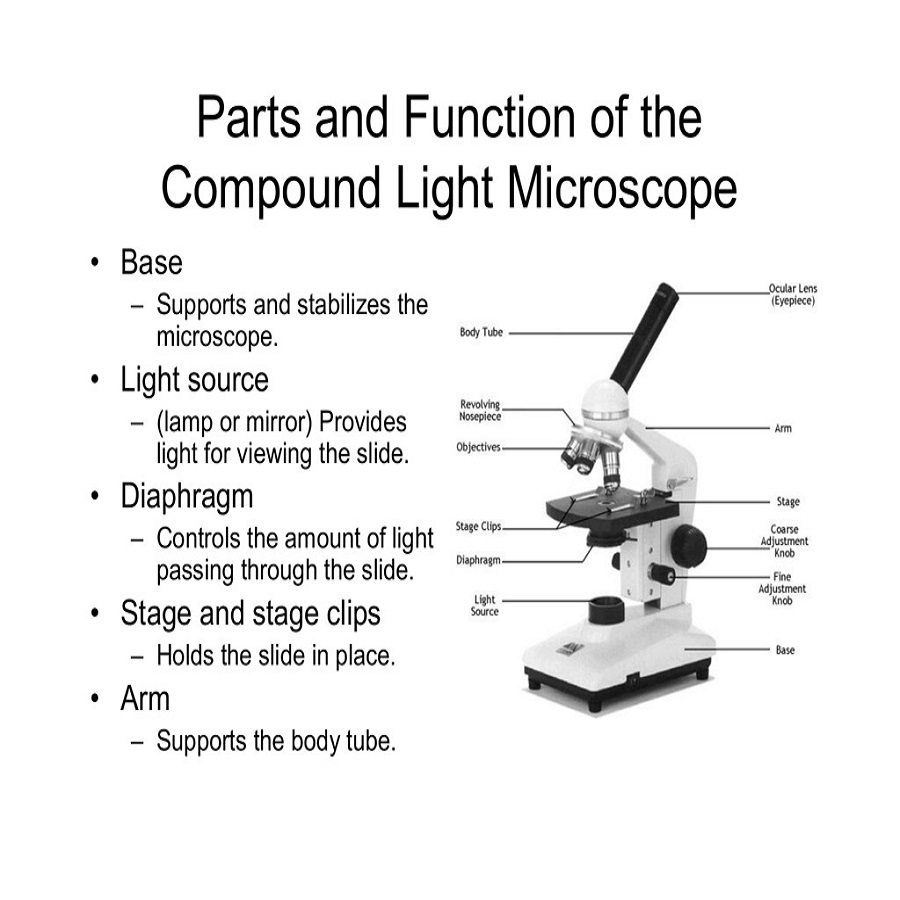
The base and arm provide key support for microscopes. They form the frame that holds all other microscope parts and functions together. The base is the bottom part that makes contact with the table or surface. It ensures the microscope stays steady during use. The arm is what users grip to carry the microscope safely. It also connects the base to the lenses and the stage above. Think of the arm as the backbone that keeps the microscope upright and stable. It’s important to handle the arm with care. Any damage to the base or arm can cause misalignment of other critical components. So, when you’re using or moving your microscope, always hold it by the arm to keep it secure. Remember, a strong and stable base and arm are essential for clear viewing. They ensure the microscope is solid and that the specimen doesn’t shake. This makes them key to achieving precise observations. When cleaning, lightly dust the base and arm and avoid harsh chemicals.
The Stage: Specimen Placement and Manipulation
The stage of a microscope is where we place specimens for examination. It’s a flat platform that securely holds the slide. The stage usually has clips or a mechanical holder to keep the slide in place. This prevents movement while focusing or during observation. A movable stage allows for precise manipulation of the specimen’s position. This feature is crucial for detailed studies. For example, when viewing cells, slight adjustments help center the specimen under the lens. It also allows for scanning across the specimen without needing to touch the slide. Most stages have calibrations. These help in noting down the position of specific areas of interest. Stages may also include a vernier scale. This fine-scale is handy for recording and relocating certain points on a slide. To maintain accuracy, keep the stage clean. Dust or debris can obstruct the specimen and disrupt the view. When handling slides, be gentle. Abrupt movements can damage the slide or disrupt the focus. Always adjust the stage carefully to get the best possible view of your microscopic world.
Illumination System: Shedding Light on Specimens
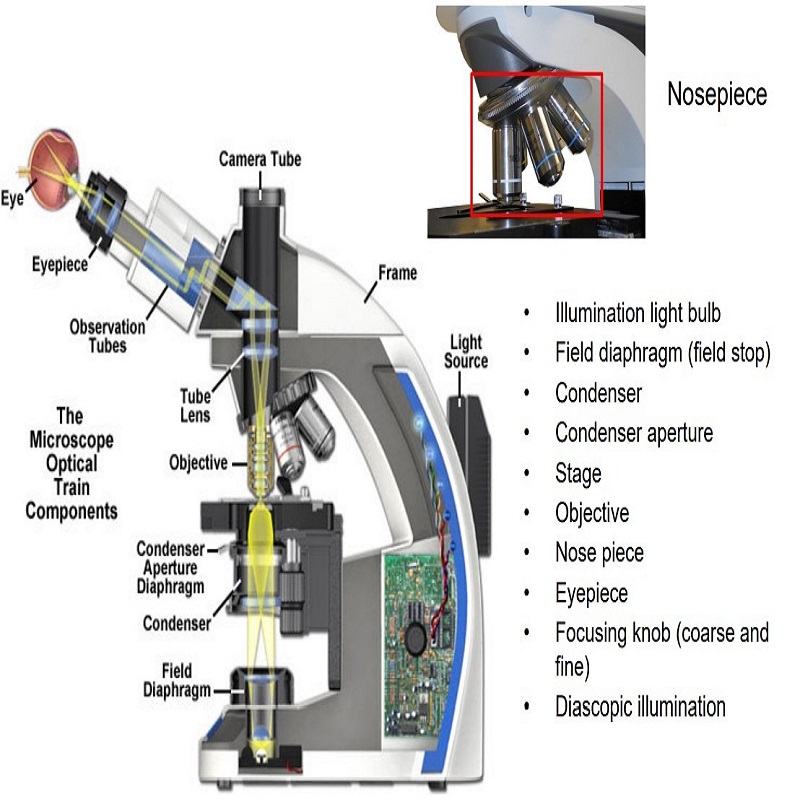
The illumination system of a microscope is crucial for clear visibility of samples. It lights up the specimen, enabling us to see fine details that are not visible otherwise. This system includes a light source, typically an LED or halogen lamp. The location of the light source can be below or above the stage. It depends on the type of microscope. Beneath the stage, the light source illuminates transparent specimens. From above, it sheds light on opaque samples.
For consistent lighting, the illumination system also has a built-in voltage regulator. This ensures the light intensity remains steady throughout use. Some microscopes even have a rheostat. This allows users to adjust the brightness manually. Brightness control is vital when viewing specimens of different thicknesses or opacities.
To evenly distribute light over the specimen, the system includes lenses and mirrors. These components guide light to the slide’s exact point needed for optimal viewing. This is where the condenser lens comes in. It focuses the light onto the specimen and plays a key role in image clarity. A clear, well-lit specimen is vital for accurate analysis and observation.
It’s important not to overlook the role of the illumination system. It directly affects the quality of the microscopic image. Regular cleaning of the light source and related parts is essential. Dust and debris can block light and lead to poor observations. In summary, maintaining a well-functioning illumination system is as crucial as any other microscope parts and functions.
Lenses: Objectives and the Eyepiece
Lenses are central to a microscope’s function, enlarging the image of the specimen. The most critical lenses in a microscope are the objectives and the eyepiece. Objective lenses sit close to the specimen. They come in different magnifications, typically ranging from 4x to 100x. Users can rotate different objective lenses into place depending on the required magnification. The eyepiece, or ocular lens, is where you peer through to see the magnified image. It usually provides a further 10x magnification.
Good quality objectives are key for crisp, detailed images. Poor lenses give blurry results, making observations tough. The eyepiece also needs to be clear and well-aligned with the objectives for optimal viewing. Always ensure the lenses are clean and free of dust. Any dirt can distort the image and lead to errors in observation. Handle lenses gently to prevent scratches, which can harm the viewing quality permanently.
In summary, the right objectives and a clean eyepiece are vital microscope parts and functions. With care, these lenses can offer precise and expanded views into the microscopic world.
Focus Controls: Fine and Coarse Adjustments
The focus controls of a microscope include the fine and coarse adjustment knobs. These knobs are crucial for achieving a sharp and clear image. The coarse adjustment allows for broad movements of the stage or lenses. This helps quickly bring the specimen into a general focus. The fine adjustment, on the other hand, enables precise focusing. It tweaks the focus ever so slightly to refine the image detail.
To use these controls, start with the lowest magnification. Turn the coarse knob to move the stage up or down. Stop when you first see the specimen coming into focus. Once at low power, switch to high power if needed. Then, use the fine adjustment knob for intricate detail. This will give you a crisp, high-resolution image.
Remember, proper use of the focus controls is key to clear microscopic observation. Always adjust the knobs gently. Forcing them can damage the microscope’s gears or slide. Before and after each use, check that the focus is not too tight or too loose. Regular checks help keep these important microscope parts and functions working well.
In conclusion, the focus controls are vital for detail-rich viewing. They take us from a blurry outline to fine, sharp clarity. When used correctly, they can reveal intricate details of microscopic worlds.
Condenser and Diaphragm: Controlling Light Quality
The condenser and diaphragm are key in controlling light quality in a microscope. The condenser is a lens that focuses light onto the specimen. It makes sure the light is bright and direct. This makes the image clearer and sharper. The position of the condenser is adjustable. You can move it closer or away from the stage to change light focus.
The diaphragm, which sits under the stage, controls the amount of light. It has different sized openings, or apertures, to adjust light intensity. For clear images, choose the right aperture size. A smaller aperture lets in less light. This is good for very bright specimens. A larger aperture allows more light. It’s better for darker samples. This control of light avoids glare or shadows in the view.
Together, these parts play a huge role in microscopy. They help see fine details and improve observation. Even slight changes in their settings can affect image quality. So, it’s important to learn how to adjust the condenser and diaphragm correctly. Always start with low light and increase it as needed. This ensures you don’t damage your eyes or the specimen.
Regular cleaning of the condenser and diaphragm is also crucial. Keep them free of dust for the best light control. In conclusion, these microscope parts and functions are vital. They need careful handling and maintenance for top-notch viewing.
Additional Features: Camera Ports and Filters
Microscopes may come with extra features that enhance their functionality. Camera ports and filters are such additions that provide benefits to users. Camera ports allow for the attachment of cameras to the microscope. This lets users capture and save images of specimens for later analysis or for sharing with peers. It is particularly useful in fields like pathology and microbiology where documentation is key.
Filters are another additional feature that can be very important. They improve the quality of the image by controlling the light spectrum that reaches the specimen. For example, blue filters are often used to enhance contrast when viewing certain types of cells. They can help to highlight specific structures within a specimen, making them easier to study and interpret.
When using these additional features, it’s essential to understand their specific microscope parts and functions:
- Camera ports usually require compatible cameras and software for optimal use.
- Filters should be selected based on the type of observation needed and should be installed correctly.
In summary, camera ports expand the scope of microscopic investigation, and filters refine the viewing experience to reveal clearer, more detailed images. Careful incorporation and utilization of these features can significantly advance the observation process.
Maintenance and Care of Microscope Parts
Maintaining your microscope is key to its longevity and performance. Each part, from the base to the eyepiece, requires attention. Here’s how to care for the different microscope parts and functions.
Clean regularly, but gently. Use a soft, lint-free cloth to wipe down the microscope. Avoid harsh chemicals that can damage the parts. Lenses need special care. Use a proper lens cleaner and soft brush to remove any dust or oil. Check the focus controls for smooth operation. Do not force the knobs; this can harm the gears inside.
The stage should be free of debris. Make sure slide clips and holders are not too tight as they can break the glass slides. The illumination system benefits from a dust-free light source. A clean condenser and diaphragm will offer the best light control. Ensure that additional features like camera ports and filters are also kept clean and in good working order.
Occasionally, it may be necessary to tighten screws and check alignments. Do this carefully to avoid misalignment of the parts. In case of technical issues, consult a professional technician. Do not try to fix complex problems yourself as it may cause more harm.
Remember, proper maintenance not only extends the lifespan of your microscope. It also ensures that it functions correctly for precise and reliable observations. So, take good care of each part and it will serve you well in exploring the microscopic world.