Introduction to Microscope Components
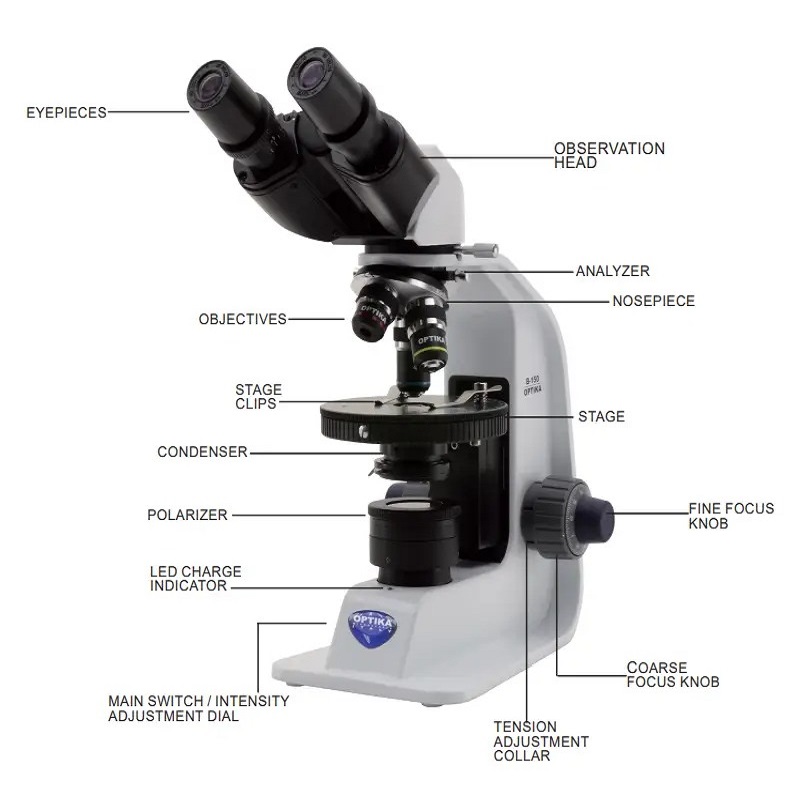
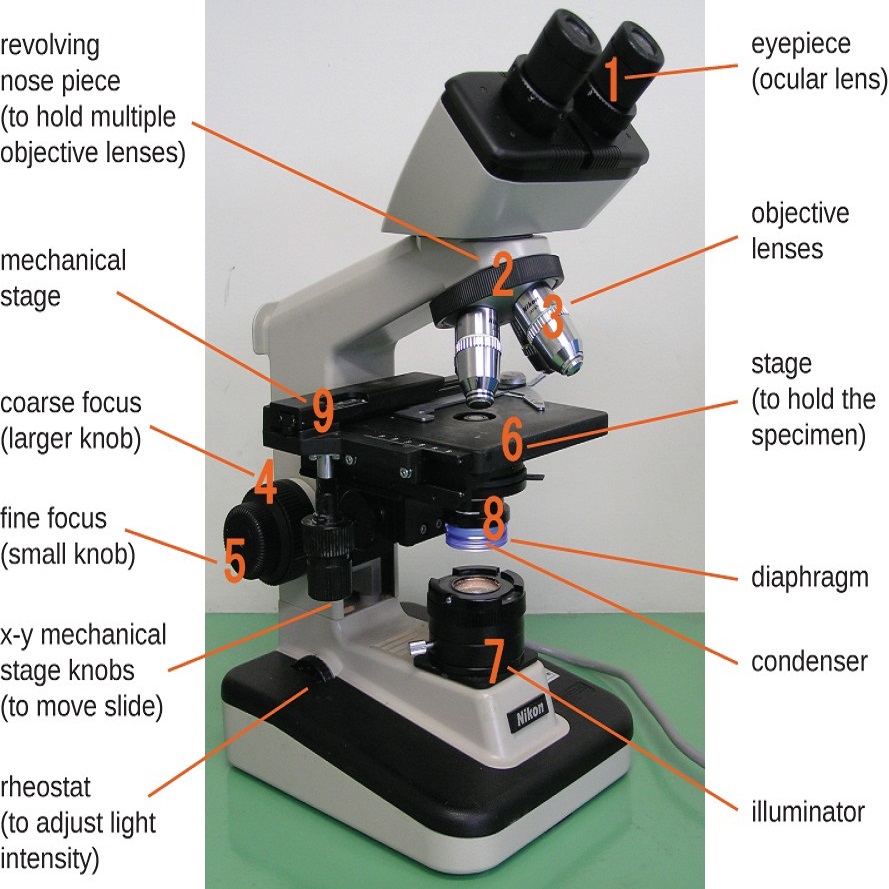
Before we dive into microscope labeling, let’s identify the basic components of a microscope. Understanding these parts is crucial for proper labeling, use, and maintenance. Most microscopes consist of three main structural parts: the head, base, and arm.
The head houses the optical parts in the upper part of the microscope. The base supports the microscope and often houses the illumination source. Connecting these two is the arm, which is also used for carrying the microscope.
Next, there are the optical components. The eyepiece, or ocular lens, is where you look through to see the sample. It typically has a magnification power of 10x or 15x. Below the head is the nosepiece, which holds the objective lenses. These lenses usually come in a variety of magnifications, commonly 4x, 10x, 40x, and 100x.
The stage is the flat platform where you place your slides. It usually includes clips to hold the slide in place. The focus knobs, located on the side of the arm, adjust the focus of the lenses. These usually consist of a larger coarse focus knob and a smaller fine focus knob.
Lastly, illumination is a key feature of a microscope. The light source may come from a mirror reflecting ambient light or an electric bulb beneath the stage. Above the light source is the condenser, which focuses the light onto the sample, and the diaphragm, which controls the amount of light reaching the sample.
Each of these components has a specific function and must be correctly identified for proper microscope labeling. As you grow more familiar with these parts, microscopy becomes a more intuitive and rewarding experience.
The Anatomy of a Microscope: Key Parts and Functions
In understanding microscope anatomy, every part has a vital role. Let’s break down these key components and their functions.
The eyepiece is your microscope’s window to tiny worlds. Embedded at the top, it magnifies the image for your eye. Most carry a 10x to 15x zoom.
Below, the nosepiece houses the objective lenses. These rotate to swap magnification levels. Commonly, you get 4x, 10x, 40x, and 100x options here.
The stage serves as the platform for your slides. It often includes clips to secure them. This is where specimens are placed for viewing.
On the arm’s side, you will find focus knobs. These adjust lens focus with precision. They come as a larger coarse and a smaller fine knob.
Illumination is crucial. It highlights your sample. Microscopes usually use mirrors or electric bulbs for this. A condenser then concentrates light on the slide. The diaphragm helps by controlling the light intensity.
The arm connects base and head. It also aids in carrying the microscope securely. Lastly, the base gives the instrument stability and may contain the light source.
For effective microscope labeling, know these parts and their roles. It simplifies use and fosters better care and maintenance of your instrument.
Step-by-Step Guide to Labeling Your Microscope
Labeling a microscope correctly is a simple but essential skill. Here’s a straightforward guide on how to label your microscope effectively:
- Start with the Eyepiece: First, locate the eyepiece where you view images. Label it with its magnification power, often 10x or 15x.
- Identify the Objective Lenses: Next, move to the nosepiece. Write down the magnification levels provided by the objective lenses, usually 4x, 10x, 40x, and 100x.
- Label the Stage: Note down the stage’s purpose as the platform for your slides and include the presence of any slide clips.
- Focus on the Focus Knobs: Find the focus knobs on the arm’s side. Label the larger as the coarse focus and the smaller as the fine focus.
- Illuminate the Illumination Source: Indicate whether the light comes from a mirror or an electric bulb and mention the role of the condenser and the diaphragm in focusing and controlling light.
- Recognize the Arm: Connect the dots between the base and the head by labeling the arm. It’s important for carrying the microscope safely.
- Stabilize with the Base: Finish by labeling the base, noting its role for stability and possibly housing the light source.
By following these steps, microscope labeling becomes a task that is both manageable and educational. It’s not just a process of naming parts, but also understanding their roles. This guide helps beginners to correctly label their microscopes, thereby making the learning process less daunting and more efficient.

Common Microscope Types and Their Label Variations
Microscopes come in various types, each with unique labeling needs. These differences are key for accurate use and understanding.
Compound Microscope Labeling
Compound microscopes are standard in many labs. They have multiple lenses for high magnification. The key parts include the eyepiece, the objective lenses, and often an adjustable stage for slide placement. Each objective lens has its own label, usually signifying magnification power such as 4x, 10x, 40x, or 100x.
Stereo Microscope Labeling
Stereo microscopes, also known as dissecting microscopes, offer a three-dimensional view. They usually have two eyepieces. Their parts include a lower magnification range, focusing on larger specimens. Labels on these microscopes may include details about the zoom range or dual eyepieces.
Digital Microscope Labeling
Digital microscopes skip the eyepieces. Instead, they display images on a screen. Labels might focus on sensor resolution and magnification capabilities. Some come with software options that should also be labeled for easy reference.
USB Microscope Labeling
USB microscopes are portable and connect to computers. Their labels often detail magnification, resolution, and software compatibility. They often have integrated lighting, which should be indicated as part of the labeling.
Electron Microscope Labeling
Electron microscopes are advanced and not common in regular labs. They use electron beams for imaging. Labeling involves indicating the vacuum system, electron source, and magnification, which can reach up to a million times. Proper labeling here is critical due to the complex operation of these microscopes.
Each microscope type has parts that should be clearly labeled to ensure proper use. Labels should be straightforward, reflecting the uniqueness of each type. For beginners, understanding these variations is critical to mastering microscope use and care.
Labeling Tips for Enhanced Microscopy Practice
Enhancing your microscopy practice starts with good labeling habits. Here are some straightforward tips to help you label your microscope accurately and with ease.
Use Clear and Concise Text: When labeling, use text that is easy to read. Choose a font or handwriting that isn’t too fancy or complex.
Employ Durable Materials: Labels should last as long as the microscope. Use sturdy, resistant labels that stick well and withstand use.
Include Essential Details: Don’t just write the part name. Add vital info like magnification power for the lenses.
Consistent Formatting: Keep the labels uniform. Use the same size, color, and style for a professional look.
Avoid Overcrowding: Place only one label per part to prevent confusion. Too many labels can complicate things.
Update Labels as Needed: If you change parts or specs, update your labels accordingly to stay accurate.
Teach Others Your Labeling System: Share your labeling system with peers. This ensures everyone is on the same page.
By following these tips, your microscope labeling will be efficient and will greatly contribute to an effective microscopy practice.
Maintenance and Care: Labeling for Longevity
When it comes to extending the life of a microscope, proper maintenance and care are essential. Labeling each part not only aids in identification but also in the preservation of the instrument. Here are some best practices for ensuring that your microscope labeling contributes to its longevity:
- Clean Labels Regularly: Over time, labels can gather dust and grime. Wipe them gently with a soft cloth to keep them legible.
- Use Non-abrasive Materials: When cleaning around labels, avoid harsh chemicals. They can cause labels to fade or peel off.
- Replace Worn Labels: Check labels often. Replace any that become difficult to read or start to come loose.
- Protect Labels from Spills: When using liquids near the microscope, be cautious. Any spills should be cleaned immediately to prevent label damage.
- Ensure Proper Storage: Store your microscope in a safe, dry place. A well-labeled cover can protect both the microscope and its labels.
- Regular Inspection: Make it a habit to inspect the labels as part of your routine microscope check-up. This helps catch any potential issues early.
By following these simple steps, microscope labeling will not only guide you in using your microscope but also play a pivotal role in its care and maintenance. Ensure that the labels you use are of high quality and suitable for the microscope’s environment, and you’ll be setting your microscope up for years of reliable service.
Microscope Labeling Worksheet: A Practical Tool for Students
A microscope labeling worksheet plays a crucial role in education. It gives students a hands-on experience to solidify their understanding of microscope parts. Learning becomes active, not just passive observation. Here’s how a worksheet can help:
It Reinforces Learning: By labeling a diagram, students cement their knowledge of each part. They recall and apply what they’ve learned in class.
It Offers Visual Aid: A clear image with labeled parts aids memory. Students can visually connect the part names to their functions.
It Promotes Active Participation: Filling out a worksheet keeps students engaged. It’s a break from listening and a way into doing.
It Validates Understanding: When students label parts correctly, it shows they grasp the concepts. This boosts confidence in their skills.
It Serves as a Study Guide: A filled worksheet is a valuable review tool. Students use it to prep for tests and practicals.
It Encourages Teamwork: Students can work together on labeling. This promotes collaboration and peer learning.
Teachers and educators can create or find microscope labeling worksheets. These might include blank labels next to each microscope part. Worksheets are often paired with detailed diagrams where students can write the names of each part. They also sometimes offer extra space for notes on the function of each part.
When introducing a microscope labeling worksheet to students, it’s helpful to walk through each part. Share the role it plays in microscope function. Encourage students to fill in the worksheet as they learn. By doing so, students will not only learn microscope labeling but also the importance of each component in the greater context of scientific exploration.
A microscope labeling worksheet makes learning tangible. Students interact with the microscope’s anatomy and build a lasting foundation for future scientific studies.
Conclusion: The Importance of Proper Labeling
Proper microscope labeling is key to becoming skilled in microscopy. It helps beginners and experts alike to use the instrument correctly and efficiently. Here’s why good labeling is so crucial:
- Ensures Correct Use: Accurate labels guide users on which part does what. This avoids mistakes in handling.
- Aids in Learning: Labeling reinforces memory of microscope parts and their functions. It is vital for students.
- Facilitates Maintenance: Clear labels remind users to handle each part with care, extending the microscope’s life.
- Promotes Safety: Proper labeling ensures that delicate parts are correctly identified and treated gently.
- Encourages Organization: When every part is labeled, it helps keep the workspace tidy and organized.
- Simplifies Upgrades: Labels make it easy to identify parts for upgrading or replacement.
In conclusion, always take the time for thorough microscope labeling. It underpins effective use, care, and learning. Embrace it as a fundamental practice in your microscopy journey.