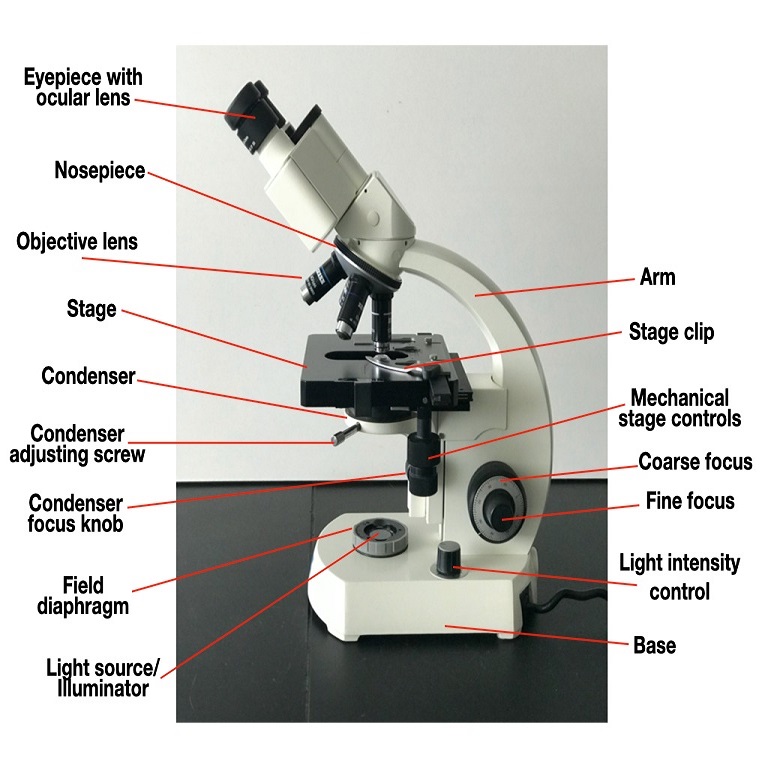
Introduction to Microscope Parts
Understanding the function and proper use of microscope parts is crucial for any aspiring scientist. Let’s begin with the basics. A microscope is a precision instrument consisting of many parts that work together. Each part plays a role in how we observe tiny, otherwise invisible details of the specimens we wish to study. Labels on these parts aid in quick identification and usage, especially important for beginners. Knowing the names and functions of each part will not only enhance your microscopy skills but also ensure safe and effective use of the equipment.
In this section, we will explore each of the major microscope parts labeled with care, starting from the eyepiece down to the base. Whether you’re using a microscope for the first time or brushing up on your knowledge, you’ll find valuable insights into the components that make up this fascinating tool. We will learn how each part contributes to the overall operation of the microscope and why proper knowledge of these parts is essential in the world of scientific exploration.
With precise functions and sophisticated design, the microscope parts work cohesively to magnify and illuminate specimens, making the invisible world visible. Understanding each part is the first step in mastering the art of microscopy. So, let’s dive in and discover the world that lies beyond the reach of our naked eyes.

The Eyepiece: Gateway to Magnification
The eyepiece, or ocular lens, is where your journey into the microscopic world begins. It’s the part you look through to see the magnified image of your sample. Typically, eyepieces increase the magnification of the specimen, multiplying what the objective lenses have already enlarged. Most standard microscopes come with an eyepiece that provides 10x magnification, essential for detailed observation.
Eyepieces often have a pointer or reticle that helps in pinpointing specific areas of interest within a specimen. This feature is especially useful for educators explaining features to students or researchers documenting findings. The role of the eyepiece in magnification is significant because it’s directly tied to what the viewer sees and allows scientists to visualize specimens with clarity and precision.
As one of the primary microscope parts labeled on every diagram, the eyepiece is critical for proper focus and clarity. It works in concert with the objective lenses, further magnifying the image projected by the objectives to your eye. When combined with the other magnifying elements of the microscope, the eyepiece becomes a powerful tool, opening up a world of fine detail that’s invisible to the naked eye.
For ideal viewing, it’s important to adjust the eyepiece to match your vision. Some eyepieces are adjustable, accommodating users with different eyesight needs. By ensuring that the eyepiece is correctly set up, you enhance your comfort during long periods of observation and prevent eye strain.
In summary, the eyepiece is a key player in the magnification of microscopic samples. Its design and features are crucial for obtaining a clear and magnified view, establishing it as the gateway to magnification in microscopy.
Objective Lenses: The Power of Detail
The objective lenses are where the true power of a microscope lies. These lenses sit close to the specimen. They provide the initial magnification of the sample. The common microscope has three to four objective lenses. They vary in magnification strength and detail capability. As they magnify, they offer a range of detailed viewing from low to high power.
Each objective lens is marked with numbers. These numbers tell the magnification level and the numerical aperture. The higher the magnification, the closer you can zoom into the sample. But, a higher magnification may mean a narrower field of view.
It’s important to select the right objective lens for your task. If you need a broad view, start with the lowest magnification. This will give you a general overview of your specimen. For finer details, switch to higher magnifications carefully. As you change lenses, you’ll notice the shift in detail and depth of field.
Properly aligning the objective lens with the eyepiece is vital for a clear image. Always begin with the lowest magnification lens. Once you’ve focused the microscope, you can increase magnification if needed.
Understanding microscope parts labeled on your device helps in selecting the right lens. Knowing when and how to shift between lenses improves your observation skills. This is crucial for any scientist or student using a microscope. The combination of correct lens choice and careful focusing brings out the power of detail in your microscopic explorations.
Stage and Stage Clips: Securing the Slide
The stage serves as a platform for your slides. It’s the flat surface where you place specimens for viewing. A secure stage ensures your slide remains still during observation.
Stage clips grip your slide in place. Without them, a slide could shift and disrupt your view. They are simple yet vital microscope parts labeled for their function to stabilize the slide.
Here’s how to use them effectively:
- Position your slide on the stage. Be gentle to avoid damaging both slide and stage.
- Fasten the slide using the clips. This step is key to keep the specimen steady.
- Ensure the area of interest is over the stage opening. This is where the light shines through.
- Adjust as needed. Sometimes you may need to move the slide slightly to find the right focus or detail.
Remember that the stage and clips work together. They make sure your specimen is perfectly positioned for the microscope’s lenses above. This alignment is crucial for clear, undistorted images. Whether you are a student learning about cells or a researcher examining bacteria, the correct use of stage and clips is fundamental. A stable slide means accurate and consistent results.
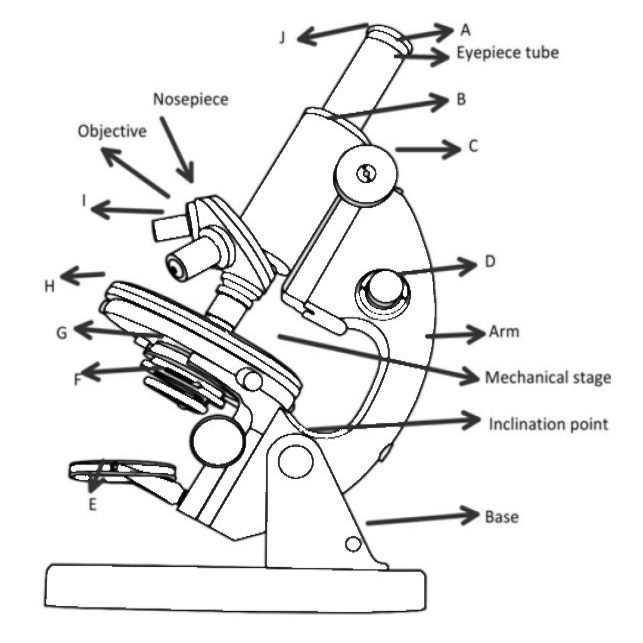
Focus Knobs: Fine-Tuning Your View
The focus knobs on a microscope are essential for sharp and precise observation. These knobs let you adjust the distance between the objective lenses and the slide. They are important microscope parts, labeled for ease of use. The fine-tuning they allow is crucial for bringing your specimen into clear focus.
There are usually two types of focus knobs:
- Coarse focus knob: This larger knob brings the specimen into the general focus quickly. Use it first.
- Fine focus knob: This smaller knob refines the focus, honing in on details for a clearer image.
To use the focus knobs effectively:
- Start with the coarse focus knob. Turn it gently until you see your sample.
- Switch to the fine focus knob. Make small adjustments to sharpen the image.
- Keep adjusting both knobs as needed. Changing magnification may require refocusing.
Remember, patience is key when focusing. Rushing can lead to a blurry view or even damage the slide. Always start with the objective lens that has the lowest magnification. This reduces the risk of the lens hitting the slide.
By mastering the use of focus knobs, you enhance your ability to observe fine details. This skill is vital for any budding scientist keen on exploring the microscopic world. Proper focusing ensures you get the most out of your microscope, making it a powerful tool for discovery.
The Diaphragm: Controlling Light Intensity
The diaphragm of a microscope is critical in managing light intensity. Its primary role is to vary the amount of light that reaches the specimen. The diaphragm sits beneath the stage and has different-sized holes. These holes adjust to let more or less light through. It’s one of the key microscope parts labeled for its ability to change the contrast and clarity of the image you see.
For instance, when you view a very thin slice of tissue, too much light can wash out details. By reducing the light with the diaphragm, you can enhance the contrast. This makes the details stand out. Conversely, for thicker specimens, you may need to open the diaphragm to see clearly.
Most microscopes use a disc or iris diaphragm. A disc diaphragm has preset holes of varying sizes. You rotate the disc to increase or decrease light. An iris diaphragm works like a camera aperture. It can precisely control light levels.
Here’s how to use the diaphragm effectively:
- Start with medium light intensity. Adjust from there based on what you see.
- Observe how changing the diaphragm affects the image. Look for better contrasts and clarity.
- Find the setting that brings out the best detail of your specimen.
By controlling the diaphragm, you become adept at preparing slides. You also obtain clearer and more detailed views. Proper use of the diaphragm can mean the difference between a good image and a great one. This is especially important for delicate observations in scientific research or education.
Illuminator: Shedding Light on Specimens
The illuminator is a key component of a microscope. It shines light through the slide, making specimens visible. This light source can be as simple as a mirror or as complex as a built-in light bulb. The illuminator’s brightness is often adjustable. This allows for the right amount of light needed for various samples.
Most modern microscopes have an LED or halogen lamp as an illuminator. LED lamps are energy-efficient and provide a cool, consistent light. Halogen lamps, on the other hand, offer intense light but can heat up the specimens. It’s important to match the light type to your specimen needs.
For example, heat-sensitive samples may require LED light to prevent damage. Always start with lower light intensity and increase as necessary. This ensures you don’t bleach or damage the sample.
The microscope parts labeled with “illuminator” are essential for clear, well-lit images. Proper use of the illuminator enhances the visibility of detail and texture in specimens for accurate observation and analysis. It’s a fundamental part of any microscopy work, from classroom learning to advanced research.
Base and Arm: The Microscope’s Foundation
The base and arm of a microscope form its foundation. They provide the microscope with stability and support, which are essential for precise work. The base is the bottom part that rests on the table, ensuring the microscope stays upright and doesn’t tip over. In most microscopes, the base also holds the illuminator, which we have learned is crucial for lighting up the specimen.
The arm connects the base to the upper parts of the microscope, including the stage, focus knobs, and where the eyepiece and objective lenses are located. When you carry the microscope, always grasp the arm with one hand and support the base with the other. This prevents accidental damage and maintains the alignment of the microscope parts labeled for use.
Here’s what you need to remember about the base and arm:
- They are the structural support for the entire microscope.
- The base should be stable to prevent wobbling or tipping.
- The arm allows for safe and easy transport of the microscope.
Keep in mind that when setting up or moving a microscope, you must handle these parts with care. A stable and undamaged base and arm are key to the reliable operation of the microscope. Whether you’re a student in a classroom or a scientist in a lab, respecting these fundamental parts can extend the life of your microscope and guarantee accurate results in your explorations.
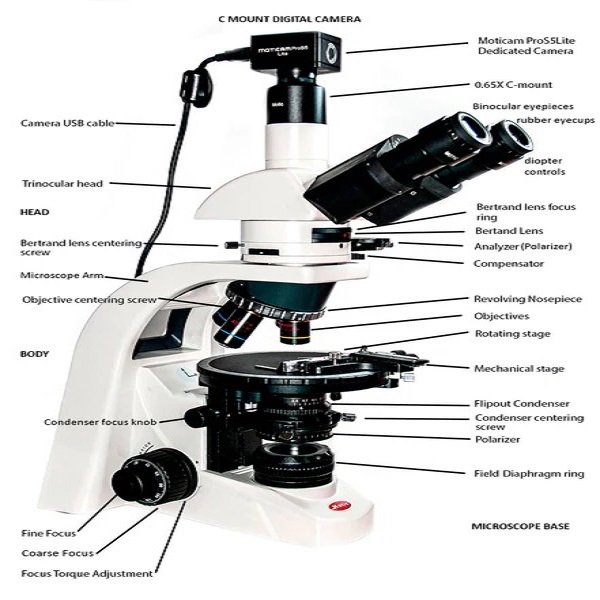
Additional Features & Accessories
While the fundamental microscope parts labeled are crucial for primary observations, several additional features and accessories can enhance your microscopy experience. These components serve specific functions, from facilitating sample manipulation to improving image quality and comfort during extended use. Let’s explore some of these add-ons:
- Mechanical Stage: Unlike a plain stage, a mechanical stage has controls. These allow precise movement of the slide in both the X and Y axis. It yields better control when scanning a specimen.
- Condenser with Iris Diaphragm: A condenser focuses light onto the specimen. When combined with an iris diaphragm, it offers fine illumination control. This results in improved image contrast.
- Oil Immersion Lenses: For very high magnification, oil immersion lenses come into play. By placing oil on the slide, these lenses reduce light refraction. This allows for clearer, high-resolution images.
- Filters: Various light filters can alter the contrast and resolution of the image. They help in observing different structures within the specimen.
- Camera and Imaging Software: For documenting purposes, cameras can be attached. Compatible imaging software helps in capturing and analyzing the images.
- Eyecup or Eyeshield: To reduce eye strain, some microscopes have an eyecup or eyeshield. This blocks out external light and provides comfort during prolonged usage.
Each of these components may come with their own set of operations. It’s important to understand how they work in tandem with the fundamental microscope parts labeled for optimal use. Implementing these accessories in your laboratory routine can significantly boost efficiency and precision in your microscopic studies.
Understanding the Optical Path
To fully grasp how a microscope works, it is essential to understand the optical path—the journey light takes through the microscope parts labeled, resulting in a magnified image of the specimen. Knowing this pathway helps in mastering the functions and adjusting the microscope for the best possible view.
The optical path begins at the illuminator, where light generates and shines upward. It then passes through the diaphragm, which controls the amount of light that reaches the specimen on the stage. Here, the light illuminates the specimen and carries the image through to the objective lenses. These lenses capture, magnify, and focus the image, which then travels upward into the eyepiece where your eye or a camera captures the magnified image.
Each element in the optical path plays a crucial role in image quality:
- The illuminator’s brightness must be suitable for the specimen’s opacity.
- The diaphragm adjusts the light to enhance contrast, revealing more or less detail.
- The correct objective lens provides the initial magnification level desired.
- The eyepiece further magnifies and presents the image to the viewer.
By manipulating the microscope parts labeled along the optical path, you gain complete control over the clarity and magnification of the image seen. This knowledge is fundamental for anyone using a microscope in scientific research, education, or simply exploring the microcosm.
Care and Maintenance of Microscope Parts
Proper care and maintenance prolong the life of a microscope and ensure accurate results. Keep your microscope covered when not in use to prevent dust accumulation. Clean the lenses gently with lens paper; avoid regular paper or fabric that can scratch. Handle all microscope parts labeled with care, especially the sensitive optical components.
Regularly check for loose screws or misalignments. Use only manufacturer-approved cleaning solutions. Ensure no liquids enter the microscope’s internal parts—this can damage the optics. Keep a maintenance log to track cleaning schedules and any repairs. This log helps identify issues early and keeps your microscope in top condition.
Lastly, when carrying or moving the microscope, support the base and hold the arm securely. This avoids drops and jolts that can lead to misalignment. By caring for your microscope, you safeguard the clarity of every discovery you make beneath the lens.