Introduction to Microscope Components
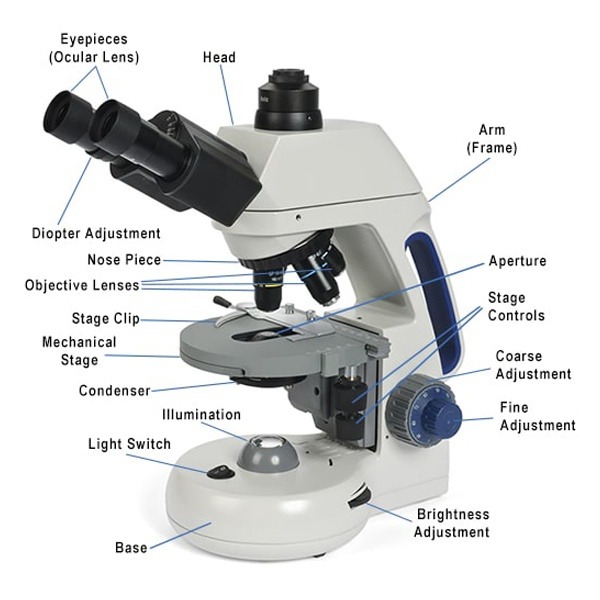
Understanding the parts of a microscope is key to mastering its use. When looking at parts of a microscope labeled, it’s like examining a road map of a complex city. Each part serves a distinct function that contributes to the overall performance of the microscope. Here is a brief overview of the main components that you will encounter when using this powerful device:
- The Eyepiece – Also known as the ocular lens, the eyepiece is where you place your eye to view the magnified image.
- The Objective Lenses – These are the primary lenses that magnify the specimen. They come in different powers, such as 4x, 10x, 40x, and 100x magnification.
- The Stage – This flat platform holds the slides where specimens are placed.
- The Illuminator – A light source that shines upward through the slide, illuminating the specimen for clear viewing.
- The Adjustment Knobs – These control the focus; coarse and fine knobs help to obtain a sharp image.
- The Base and Arm – The structural components that support the microscope and allow for safe handling.
Each component is carefully designed to enhance the functionality and precision of the microscope. The quality of these parts is critical for producing clear, magnified images. In subsequent sections, we’ll dive into each part in more detail, starting with the eyepiece – your gateway to magnification. With every use, familiarize yourself with these parts to become skilled in preparing and observing specimens. Beyond their simple labels, recognizing and understanding these components’ roles will greatly enhance your microscopic explorations.

The Eyepiece: Gateway to Magnification
The eyepiece, often called the ocular lens, is where magnification begins. It’s the microscope’s interface, directly connecting us to the microscopic world. This lens typically offers 10x magnification, serving as a multiplier of the objective lenses’ power. It’s crucial for achieving the final image size that we see.
To use the eyepiece effectively, you should adjust it to match your eyesight. Many models have a diopter adjustment, which compensates for differences between your eyes. Aligning the eyepiece carefully can prevent eyestrain and ensure a clear image. Most eyepieces also have a rubber or soft plastic eyeguard. This cushioning helps maintain the correct viewing distance and blocks out extraneous light.
Regular cleaning of the eyepiece lens is essential. Use a lens cloth and proper cleaning solution to keep it free from dust and fingerprints. Clean optics are vital for clear viewing. Remember, the eyepiece is not just a lens; it’s your window to the details of specimens magnified by the microscope.
The Objective Lenses: Magnifying the Minute
The objective lenses are vital for zooming in on specimens. These lenses, located close to the slide, greatly increase the image size. They come in sets, often ranging from 4x to 100x magnification levels. Each lens offers a different degree of zoom, allowing for versatile viewing options.
When you rotate the nosepiece, you switch between these lenses. This lets you gradually increase the magnification. For instance, you may start with the 4x lens for a general view. Then move to the 10x for more detail. Finally, use the 40x or 100x when you need to see fine details.
The 100x lens usually requires oil immersion. A drop of oil between the lens and slide reduces light refraction. This results in a clearer, more detailed image. It’s important to carefully use and clean these lenses, especially the oil immersion ones.
To get the best from these lenses, always ensure the lenses are clean. Any dirt or smudges can blur your view. Use a proper lens cleaning solution and a microfiber cloth to avoid scratching.
In summary, objective lenses are the heart of magnification in a microscope. By mastering their use, you can explore the microscopic world in amazing detail. Remember to handle them with care, keeping them clean for the best view of your specimens.
The Stage: A Platform for Specimens
The stage of a microscope is its central platform. It supports the slides that hold the specimens we view. The stage typically includes clips or a mechanical holder. These secure the slide in place, so it doesn’t move during examination.
The stage’s surface is usually flat and sturdy. This ensures stability for the slides. Some stages are equipped with a mechanical stage control. This feature lets you precisely move the slide in horizontal and vertical directions. You can thus explore different areas of your specimen without touching the slide. This can be crucial when using high magnification, as even small movements can shift the field of view drastically.
Under the stage, you will often find the condenser. This lens focuses the light from the illuminator onto the specimen. It’s important for achieving the brightest and sharpest image possible. Right below or beside the condenser, there’s an iris diaphragm. This tool adjusts the diameter of the light beam. By doing so, it controls the amount of light that reaches the specimen.
In conclusion, the stage is a key part of a microscope. Proper use of the stage and its controls is essential for accurate observations. Get comfortable with adjusting the stage to best view your specimens. A steady stage leads to clear, stable images, making your microscopic exploration a success.
The Illuminator: Shedding Light on Observations
The illuminator is a key component in a microscope. It brightens the specimen from below for clear viewing. Think of it as a dedicated microscope flashlight. It’s essential for viewing transparent or semi-transparent slides. Without it, observing details in specimens would be nearly impossible.
Most models come with a built-in light source, such as LED or halogen bulbs. LED lights are popular due to their long life and consistent brightness. They also produce less heat, which is good for delicate specimens. Halogen bulbs, on the other hand, offer a warmer light. Some users prefer this for certain types of viewing.
A vital aspect of the illuminator is its adjustable intensity. This feature lets you control the brightness level. You can reduce glare on shiny specimens or increase light for darker samples. This adjustability helps get the best possible image under various conditions.
To sum up, the illuminator plays a crucial role in the function of a microscope. It lights the path to discovery in the microscopic world. For optimal viewing, tweak the illuminator’s brightness to match your specimen’s needs. This will ensure you see a crisp, detailed image every time you peer through the eyepiece.
The Adjustment Knobs: Focus and Precision
The adjustment knobs are essential for fine-tuning the focus of your microscope. These are usually two knobs: the coarse focus and the fine focus. Begin by using the coarse focus knob for initial adjustment. This moves the stage up or down rapidly. It helps find the right starting point at a lower magnification.
Once your specimen comes into view, switch to the fine focus knob. This knob allows for more precise control. It sharpens the image at higher magnifications. These small movements are crucial for detailed inspections. Without them, images would remain blurry.
Remember to turn the knobs gently. Rough handling can damage the microscope or slide. Always start with the lowest magnification. Gradually increase the view while adjusting the focus. You can master the use of these knobs with practice. This leads to highly detailed and crisp images.
In summary, the adjustment knobs work together to bring specimens into focus. They are critical for achieving precision in your microscopic observations. With careful use, the knobs enable you to see finer details that would otherwise go unnoticed.
The Base and Arm: Structural Support
The base and arm are the fundamental parts of a microscope labeled that ensure its stability and structure. The base acts as the foundation, providing a steady platform for the entire instrument. Its weight keeps the microscope anchored, preventing any unwanted movement that could blur or distort the specimen’s image. The arm serves as the backbone, connecting the base to the rest of the microscope and allowing safe and easy transport of the device.
To ensure full reliability, the base should rest on a flat surface free from vibrations. It’s important to grip the arm firmly while carrying the microscope to avoid accidents. The robust construction of these parts enables users to focus on their specimens without worrying about the microscope shifting or toppling over. Regular inspection is advisable to check for any damage or looseness that could compromise the microscope’s structural integrity.
Suitable care for the base and arm is simple yet essential. Keep them clean from dust and spills by wiping with a soft, dry cloth. If they become loose, tighten the screws to maintain the microscope’s stability. These parts may not be involved directly in magnification, but without them, the delicate process of observation would not be possible. So, while utilising your microscope, remember that the base and arm are crucial in supporting the detailed work you perform above them.
Care and Maintenance of Microscope Parts
Taking care of a microscope is crucial for its longevity and performance. Keeping the parts of a microscope labeled and maintained ensures reliable results and safeguards your investment. Here are key tips and practices for the care and maintenance of your microscope:
- Handle with Care: Always lift the microscope by the base and the arm. Avoid touching the lenses with your fingers.
- Regular Cleaning: Use lens paper or a microfiber cloth to clean the optics. Employ a lens cleaning solution for stubborn dirt.
- Avoid Moisture: Keep the microscope in a dry area. Moisture can cause rust and damage the mechanical parts.
- Cover When Not in Use: A dust cover protects the microscope from dust and other contaminants when it’s not in use.
- Check for Alignment: Periodically check if the parts of your microscope are properly aligned. Misalignment can lead to poor image quality.
- Storage: Store the microscope in a cool, dry place. Extreme temperatures can harm its sensitive components.
Remember, a well-maintained microscope is a powerful tool. By taking good care of the different parts of a microscope labeled, you can ensure it performs accurately every time it’s used. Regular maintenance not only helps deliver clear images but also extends the lifespan of this intricate instrument. Treat your microscope with the care it deserves, and it will continue to reveal the hidden details of the microscopic world to you.