Introduction to Microscope Components
Understanding the parts of a microscope is essential for any user. A microscope has many components, each with a critical role in observation. In this visual guide, we’ll explore each of these microscope labeled parts in detail. By learning about these components, you can use them more effectively in your studies or research.
From the base and arm that provide stability to the intricate optical system, we’ll break down their functions. Proper knowledge of the microscope’s parts also ensures that you care for the equipment correctly. This extends its life and maintains the accuracy of its magnifications. Let’s unlock the complexities of a microscope, making it simpler to comprehend and operate.
The Base and Arm: Supporting Structure
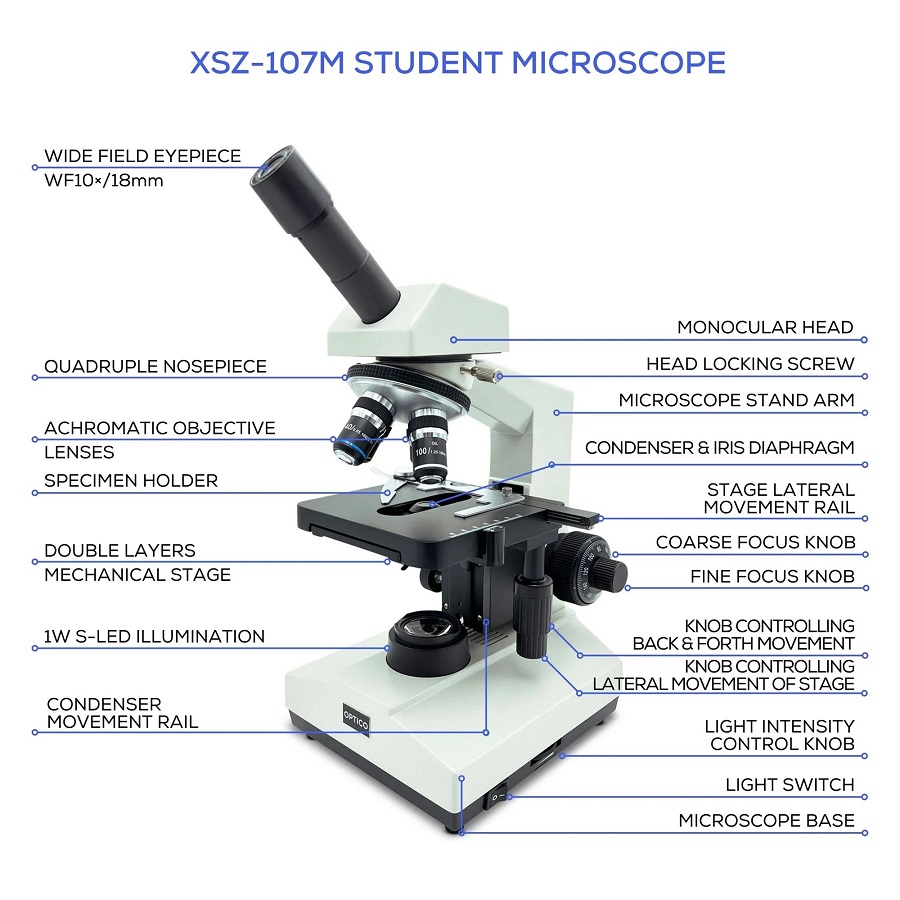
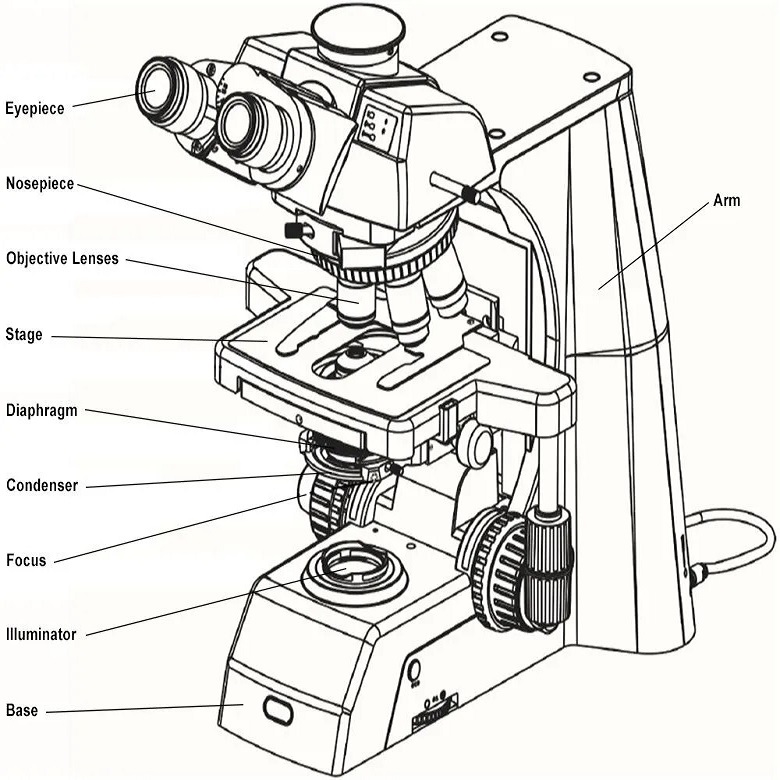
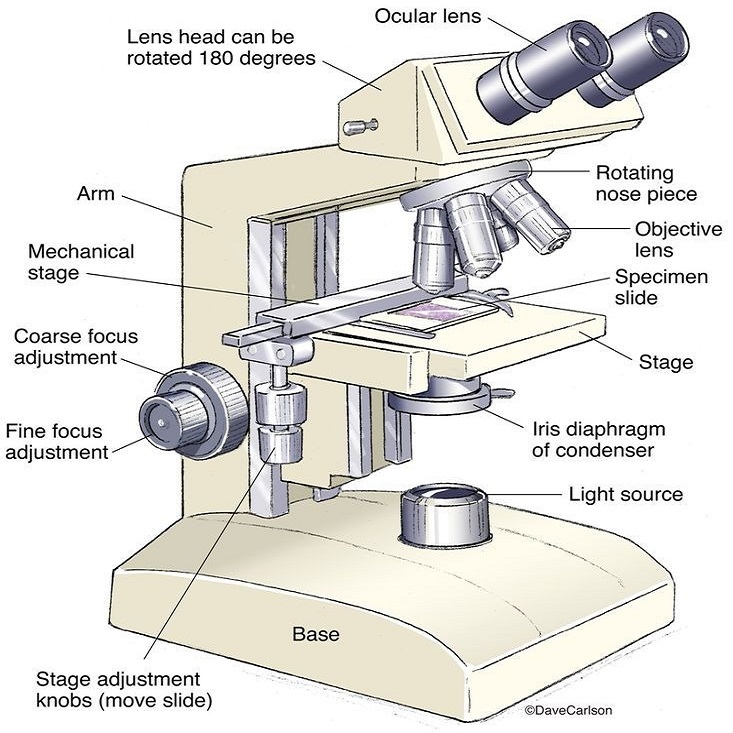
The base and arm of a microscope form its structural foundation. They are among the key microscope labeled parts every user should know. The base is the flat, sturdy bottom that rests on the table. It supports the microscope’s weight and keeps it stable. This part is crucial because stability is necessary for accurate observations. Attached to the base is the arm. Users handle the microscope by the arm when moving it. The arm also connects the base to the upper parts of the microscope, including the stage and optical system. Think of the base and arm as the spine of the microscope, giving it structure and balance. Remember that carrying a microscope by the arm ensures it stays intact and prevents damage. In conclusion, the base and arm are integral for maintaining the durability and functionality of your microscope.

Illumination System: Light Source and Controls
Every microscope needs light to illuminate the specimen being observed. The illumination system is a key microscope labeled part. It includes a light source and controls to adjust the brightness. Let’s delve into these components.
Light Source
The light source, often an LED or halogen lamp, is located beneath the stage. It shines light upward through the specimen. This allows clear viewing of the sample placed on the stage.
Brightness Controls
The brightness controls are usually dials or switches. These are found on the microscope’s base or arm. Turning them adjusts the light intensity. It helps in obtaining the best possible view of the specimen without glare or strain on the eyes. Proper use of these controls is crucial to achieve clarity in observations. By mastering the illumination system, you can enhance the quality of your microscopic examinations.
The Stage: Specimen Placement and Movement
The stage is where you place your specimen for observation. It’s a flat platform, centrally located above the base and below the optical system. The precise design of the stage is crucial for microscope functionality.
Specimen Placement
On the stage, you often find clips or a mechanical stage holder. These features secure the specimen slide in place. It’s important to ensure your specimen is flat and centered. This gives you the best chance for a clear view.
Stage Movement
Many microscopes come with knobs or levers on the stage. These allow you to move the stage and, thus, the specimen. You can slide it left, right, up, or down. This movement is key for scanning different areas of your sample. It must be done gently to keep your specimen safe and in focus.
By knowing how to properly place and maneuver specimens on the stage, you improve your viewing experience. Correct use of the stage is a fundamental skill for any microscope user. It ensures that every part of the specimen can be observed with precision.
Optical System: Lenses and Magnification
The optical system is a pivotal part of the microscope. It consists of a series of lenses that work together to enlarge the image of the specimen. This section will explain the primary microscope labeled parts within the optical system: the objective lens and the eyepiece lens.
Objective Lenses
At the lower part of the optical tube, you will find the objective lenses. These are the primary magnifiers of the microscope. Common microscopes have a selection of these lenses. They range from low to high magnification powers, often 4x, 10x, 40x, and 100x. Rotate the nosepiece to switch between different objective lenses. Choose the lens based on the detail you need to see.
Eyepiece Lens
The eyepiece, or ocular lens, sits on top of the microscope’s optical tube. When you look through it, you see the magnified image. It typically has a magnification of 10x. Coupled with the chosen objective lens, it compounds the magnification. This dual-lens system allows for high levels of detail.
Total Magnification
To calculate the total magnification, multiply the eyepiece magnification by that of the objective lens. For instance, a 10x eyepiece and a 40x objective lens result in 400x total magnification.
The optical system’s precise engineering ensures that the image retains clarity at higher magnifications. It is vital for users to understand how these lenses function. Doing so leads to better use and care of the microscope, and to more reliable observations.

Focus Mechanisms: Fine and Coarse Adjustment
The focus mechanisms on a microscope are crucial for achieving a sharp image of the specimen. They generally consist of two separate controls: the coarse and fine adjustments.
Coarse Adjustment Knob
The coarse adjustment knob is typically the larger one and is used for making broad changes in focus. It moves the stage up or down with greater speed, helping you quickly bring the specimen into the general focus area. It’s the first control you use after placing your slide on the stage.
Fine Adjustment Knob
After the image is roughly in focus using the coarse knob, the fine adjustment knob allows for smaller, more precise movements. This smaller knob fine-tunes the focus, refining the image clarity. It’s especially important when you use higher magnification to see the details in the specimen.
Understanding how to use these adjustments is important. Start with the coarse knob and then switch to the fine knob for perfecting the focus. This not only prevents damage to the microscope labeled parts, such as the specimen and lenses but also ensures a clear observation of the sample. Mastery of these controls directly affects the quality of the microscopy work.
Ocular and Eyepiece: Viewing the Magnified Image
The ocular and eyepiece are vital microscope labeled parts for viewing. Let’s discuss their roles.
Ocular Lens
The ocular lens, often called the eyepiece, is at the top of the microscope. When you peer through it, that’s where you see the image. Typically, it magnifies the image by 10 times (10x).
Eyepiece Tube
The eyepiece tube holds the ocular lens. It connects to the microscope’s body. It ensures the eyepiece stays in the correct position for you to look through.
Viewing the Magnified Image
As you look through the eyepiece, the specimen appears larger. This is due to the combined magnification of the eyepiece and the objective lenses selected. Remember, the total magnification is the eyepiece’s magnification times the objective’s.
By understanding the function of the ocular and eyepiece, you enhance your use of the microscope. It helps to ensure a clear and enlarged image during your observations. Always handle these microscope labeled parts with care, keeping them clean and free from scratches for the best view possible.

Additional Accessories and Their Functions
Besides the main microscope labeled parts, several additional accessories play a role in the functionality of a microscope.
Mechanical Stage
The mechanical stage is a more advanced type of stage. It holds and moves the slide with precision. Using knobs, it adjusts the slide’s position without manual handling. It provides stability and ease in viewing different specimen areas.
Condenser
The condenser sits below the stage, focusing light on the specimen. It often has its own set of controls. These adjust the condenser’s height and the light’s concentration. It enhances the specimen’s clarity and contrast.
Iris Diaphragm
Located within the condenser, the iris diaphragm controls light amount through its adjustable opening. Closing and opening it alters the light’s intensity and focus on the specimen. This refines the image’s depth and detail.
Filters
Filters can be placed in the light path to alter the light quality. They help in enhancing or reducing certain features of the specimen. Different colors and densities of filters serve various observation needs.
Slide Clips
Some stages come with simple clips instead of a mechanical stage holder. These clips secure the slide manually. They are useful for quick placement and adjustments during examinations.
Understanding these additional parts is just as crucial. They contribute to a more effective and detailed observation. Knowing how to use these accessories will enhance your experience with the microscope. Handle them with care to maintain the integrity of your microscope’s performance.
